Getting Started
Getting started with the Dropbox API
Getting up and running on the DBX Platform is fast and easy. The powerful, yet simple, API allows you to manage and control content programmatically and extend Dropbox capabilities in new and powerful ways. This guide will take you through the basic steps required to get up and running and create a simple file organization app to help organize files within your Dropbox account.
This guide is divided into the following sections:
- Creating a Dropbox app and navigating the App Console
- Working with the API documentation and API Explorer
- Writing a script for a simple expense organizer app
Feel free to skip ahead if you're already familiar with the content in any given section.
Also, please note that this guide focuses on the full Dropbox API & SDKs. For Javascript components to quickly and easily allow selecting, saving, and viewing content in Dropbox, see the Chooser, Saver, and Embedder.
Set Up
To get the most out of this guide you'll need to have a few things in place before we get started:
- Dropbox account
- Python installation
- Dropbox Python SDK
- Text Editor
- Zip file of sample expenses
Dropbox account
You'll need to have a Dropbox account to access the APIs. If you don't already have one, you can sign up for a free account here.
Please also install the Dropbox desktop application here.
Python Installation
For this guide we'll be writing the organizer script in Python and we're going to leverage the Dropbox Python SDK to make accessing endpoints even easier.
- Check if you have Python installed on your computer by opening a terminal session, or a Windows cmd shell, and enter:
python -VThis command will display the current version of your interpreter, or an error stating that Python cannot be found. - If Python is missing, you can install it from here.
Dropbox Python SDK
To install the DBX Platform Python SDK, from the Windows command line or a terminal session enter:
pip install dropbox
Text Editor
Use your favorite plain text editor or Python IDE.
Sample expense files
You can download a collection of sample expense files here.
Now that you have everything setup, you're ready to build your first Dropbox app.
Creating a Dropbox app
The DBX Platform developer portal can be found at www.dropbox.com/developers. Here you can create and manage your DBX Platform apps, browse documentation and examples, and download SDKs for popular languages.
Let's start by creating a new app. After navigating to the developer portal, click App Console.
Here you can manage your app properties and settings. If this is your first time here, things probably look a little barren. Let's fix that by clicking Create app.

You'll see a wizard that will walk you through creating a new app.
Your permission and access type determine which API calls and data your app can access. Read more about app permissions in the developer guide.
For our first example app, lets select App folder access.
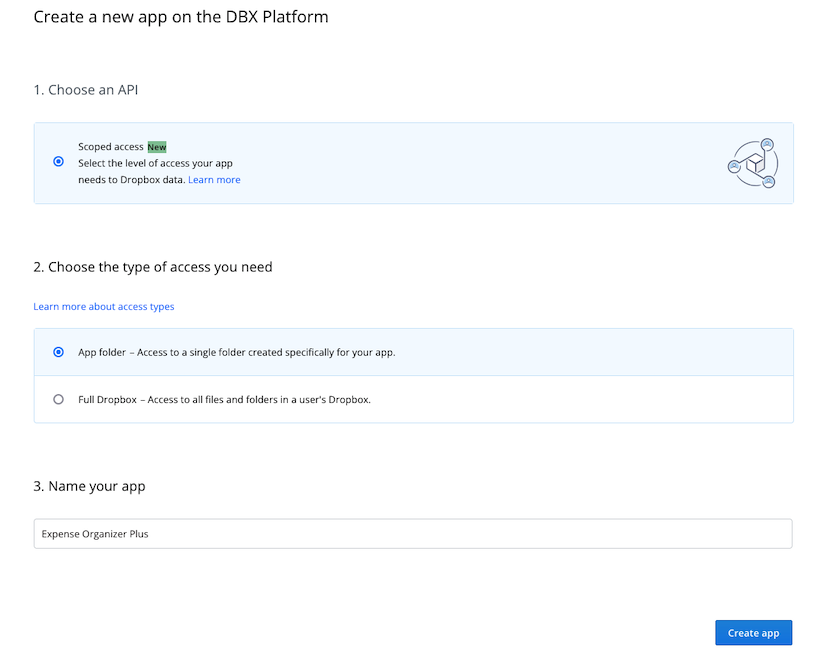
When selecting a name, be sure to review the naming guidelines in the Branding Guide to avoid any possible issues or conflicts. Once you have a name that meets the guidelines, go ahead and click Create app.
Navigating the App Console
Once your app has been created, you'll be taken to the App Console:

The App Console is broken into four primary sections: Settings, Permissions, Branding, and Analytics. Let's take a look at all four.
Settings
The settings tab contains important information about the configuration of your app. You'll see items like your app key and secret which are required to perform OAuth authentication, as well the ability to apply for production status, and to delete your app entirely. Here's a quick rundown of each major section within the settings tab:
Status
Displays the current status of your app as either Development or Production. By default, all apps are created in the development state, which limits the total number of users who can access your app during early development.
When you're ready to release your app publicly, you can request a review by clicking the Apply for Production button. Your app will undergo a production readiness review by Dropbox and will either be approved or denied. If your app is denied, feedback will be provided so that you can correct any issues and resubmit for production review. For information and guidance on having a seamless transition from development to production status, please review the production approval section of the DBX Platform developer guide.
Development users
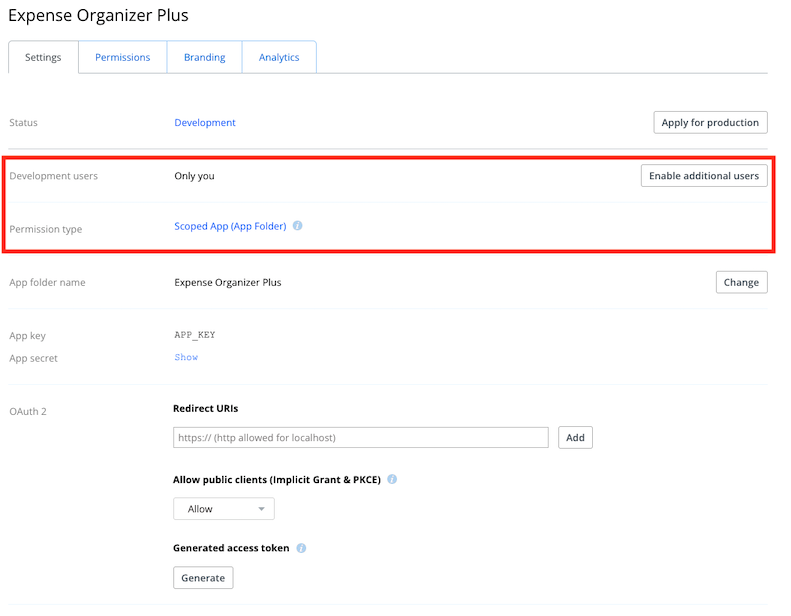
Initially, your new app will only be authorized for you. Clicking 'Enable additional users' will allow a limited number of additional users to link to you application for testing or internal use. You'll need to apply for production to allow a larger audience to link your app.
Permission type
Displays the level of access your app will have to any linked Dropbox account. For non-Business API apps this can be either App folder or Full Dropbox. Business API permissions are described in the Access types section of the Business API reference documentation. Scoped apps have more granular control over what functionality they can access. You can more information on scopes in the OAuth Guide.
App folder name
If you've selected App folder access permissions for your app, this field will be present. By default this will be the same as your app name. You can use the Change button to modify the folder name that will be created for your app. Just be mindful that the new name respects all of the conditions put forth in the 'Production Approval' section of the DBX Platform developer guide and is not misleading or confusing to end users.
App key/App secret
These are values that uniquely identify your app. When you implement OAuth app authorization, you'll use these values as part of the authorization flow.
OAuth 2
This area contains items that allow you to configure various portions of the OAuth authorization flow for your app.
- Redirect URIs. These are the allowable URIs that your app can redirect to after a user has granted access. Redirection to any URI not specified here will not be allowed.
- Allow implicit grant. This setting determines whether or not the 'token' flow can be used for this app. If your app is running client-side leave this as-is. If not, you should disable this feature. For more information about implicit grant see: IETF RFC6749
- Generated access token. This can be used to automatically complete app authorization against your Dropbox account and provide an API token you can start using immediately for testing. Once you move beyond the testing phase you will need to enable an OAuth flow for authorization.
Chooser/Saver/Embedder domains
If you are making use of the Chooser, Saver, or Embedder you'll need to specify the domains from which you're hosting them here. This ensures that other websites cannot embed the Chooser, Saver, or Embedder and impersonate your app.
Webhooks
Webhooks allow you to have Dropbox notify your server when content inside a user's Dropbox changes. This is useful if you want to initiate a workflow to process newly added or modified content. If you'd like to enable this functionality within your app you should review the webhooks reference documentation.
Delete app
When the time has come to say goodbye, this is where you can remove your app. If you need to change the access type of your app (e.g., moving from App folder to Full Dropbox), you'll need to delete the existing app and create a new one with the desired access type.
Permissions
The Permissions tab allows you to enable and disable specific scopes for your app. The scopes enabled for your app determine what API functionality your app can use, such as reading file data, changing sharing settings, etc.

Branding
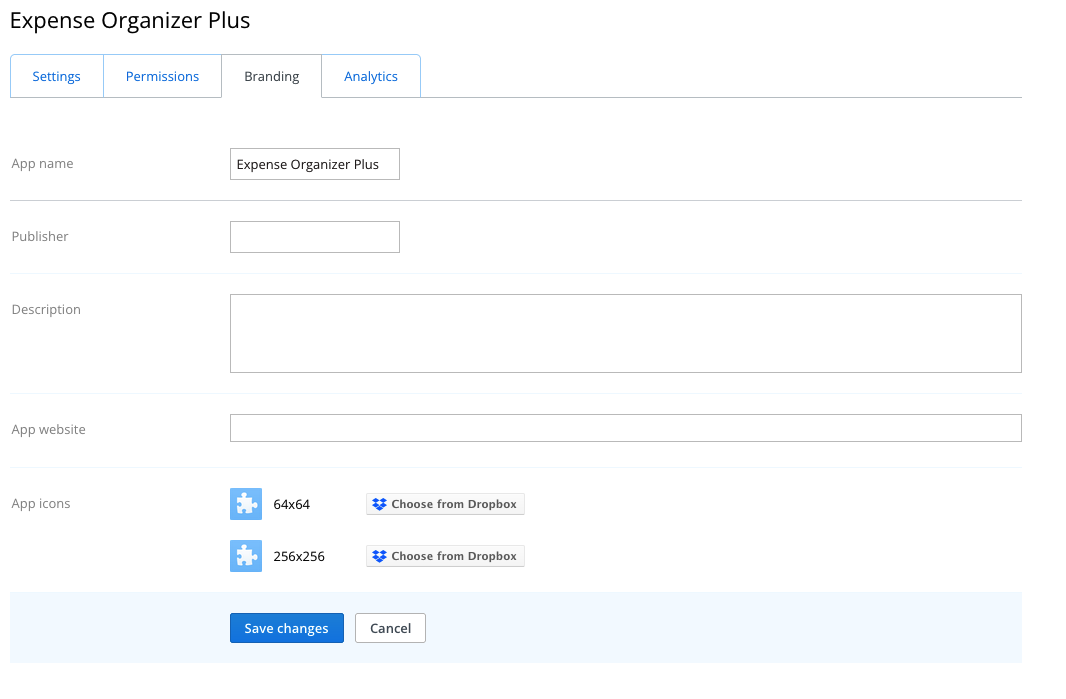
The Branding tab allows you to configure information and icons displayed to end users during the authorization process. This information is also used during the production approval process and must adhere to the rules provided in the Branding Guide.
App name
While your app is in development status, you can use this to change your app name. All requirements at app creation time still apply, as do any limitations imposed by the Branding Guide and Developer Terms and Conditions. If your app has been approved for production status and you need to make a name change, you'll need to request it through the developer contact page.
Publisher
The name of the company or individual distributing the app.
Description
A brief summary of the functionality of the app.
App website
The URL of app/publisher website.
App icons
Use this to upload a small and large icon for your app.
Analytics

The Analytics tab is where developers can monitor the usage and growth of their app.
Summary
At this point we've created our first Dropbox app and explored the App Console to configure and monitor our app. The next step in building our app is to examine the API reference documentation and test some endpoints so we can start designing the functionality of the expense organizer app.
API documentation and exploration
An important part of developing your Dropbox app is being able to reference and understand the API documentation.
The API documentation isn't just a great reference tool but is also a place to discover and test new functionality. In this getting started guide we'll discuss how to access and interpret the documentation and we'll cover the API Explorer, a tool you can use to rapidly test different API endpoints when prototyping a new Dropbox application.
DBX Platform documentation
The DBX Platform documentation can be found here.
It contains reference material, installation instructions for platform SDKs, example code, and reference guides for topics such as authentication, namespaces, and data ingress.

For this guide, we'll be referring to the HTTP documentation, but several platform specific SDKs are also available. While the SDKs and HTTP endpoints are functionally equivalent, many developers prefer using SDKs when possible as they can reduce the amount of boilerplate code required to start accessing the DBX Platform. For now though, go ahead and click HTTP from the list of platforms.
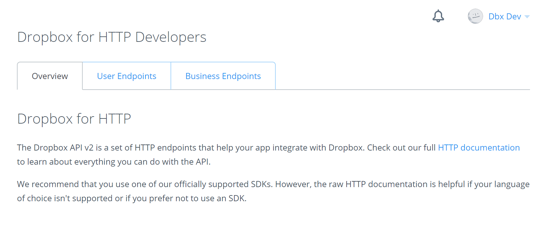
On the HTTP documentation page, you'll see tabs for two types of endpoints:
User Endpoints. Contains reference documentation for all user content related endpoints. These are the core Dropbox endpoints providing the ability to perform tasks such as file and folder creation, sharing, and accessing Paper documents. If you are building an application targeted solely towards manipulation of content for a single user at a time, these are the only endpoints you will need to use.
Business Endpoints. This section contains documentation for endpoints targeted at Dropbox for Business. These endpoints allow you to perform team, and team member, management tasks such as: adding and removing team members; creating and modifying groups and group membership, generating basic team reports; and examining the team event log.
Be aware that applications targeted towards Business endpoints have a different set of permissions than non-Business API applications. If your business application requires the Team member file access permission you'll utilize user endpoints for those actions. See the Member file access section of the Business endpoints documentation for more information.
For our first application we only need to be concerned with user endpoints, so let's dig into that documentation a bit more. Click the User Endpoints tab at the top of the HTTP documentation page:
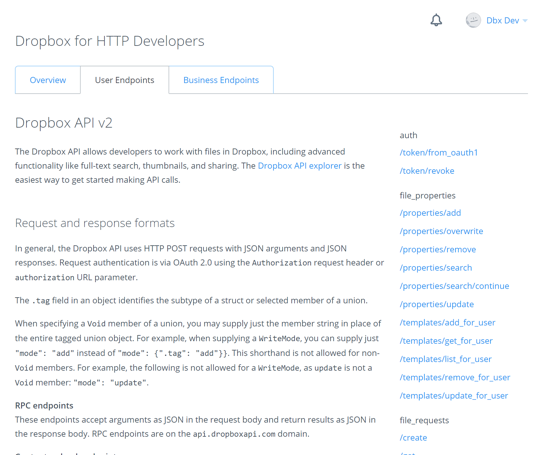
The reference documentation page is broken into three columns. The left column contains general navigation content for the developer website. The right column contains a listing of all the API endpoints. The center column contains endpoint documentation and other reference content. The center column will auto-scroll to the relevant endpoint documentation when any endpoint in the right column is selected.
Let's examine some API endpoint documentation in a bit more detail. From the right column, scroll to and click /get_metadata under the files namespace:
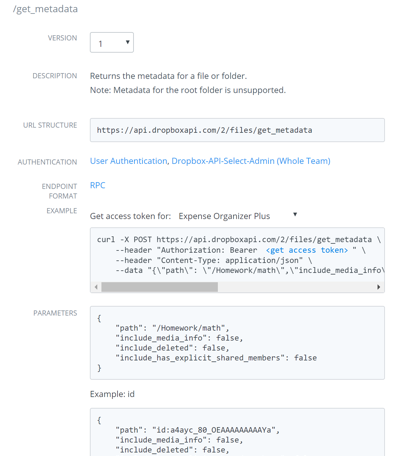
Each endpoint documentation entry is divided into several sections. Let's take a look at those in more depth:
Description
A brief summary of the function this endpoint provides, along with any potential caveats and/or usage notes
URL structure
The direct access URL to the endpoint
Authentication
Describes the authentication types supported by this endpoint. These can include App Authentication, User Authentication (including Dropbox-API-Select-User), Dropbox-API-Select-Admin (for Team Admin access), or even No Authentication for certain endpoints.
Endpoint format
DBX Platform endpoints support different request and response formats, and the format supported by any given endpoint will be listed here. Most endpoints support an RPC-sytle format via a simple HTTP POST, but certain endpoints such as /upload or /download are content-based and will require different forms of interaction.
Example
In the case of HTTP endpoint documentation the example will contain a curl command with sample parameters you can use to quickly test an endpoint.

The 'get access token' link allows you to easily get an access token to run the example. Once you've selected an App, click "get access token" within the example text to substitute in your actual token and you can copy/paste the example request to test it out. Remember, any access token should be stored securely and never shared. You can use the /token/revoke endpoint to disable the token.
Parameters

The parameters section will show various examples of arguments that an endpoint will accept followed by a detailed breakdown of the complete parameter list.
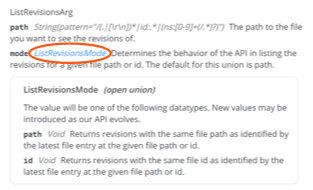
When a parameter is a typed class/struct, detailed information can be expanded by clicking the type definition:
Returns
The returns section of an endpoint definition will contain a sample of the data returned by an endpoint, followed by a detailed breakdown of all possible entities that can be included in the result.
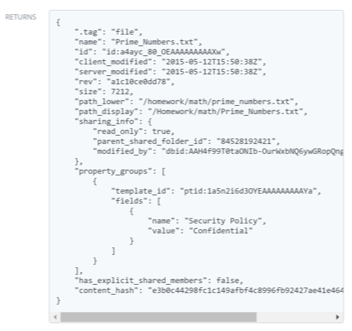
Just like in the parameter section, any named types can be expanded to see the details of their contents.
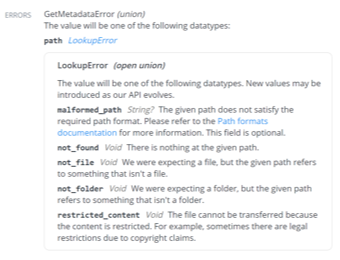
Errors
The errors section will provide information on the endpoint-specific errors (409 return code) that you might encounter when working with an endpoint. Please note that there are other general errors you may encounter when working with the DBX Platform. For listing of all error types, please refer to the Errors section of the HTTP reference documentation.
Required Scope
The required scope section will detail which scope is required to access this API endpoint (for scoped apps).
API Explorer
Now that we have a clear understanding of the reference documentation we'll be able to quickly identify and understand the endpoints required to build applications that integrate with Dropbox. One tool that is useful to quickly test endpoint functionality, especially when prototyping ideas, is the API Explorer which can be found here
The API Explorer provides a quick and easy way to call endpoints, test out different parameters, and see the results.
Note that by default the API Explorer launches with the set of user endpoints. If you want to explore the Business endpoints click 'Switch to Business endpoints' in the upper right-hand side. We won't be covering Business endpoints here, but they work in the same way as user endpoints so it shouldn't be difficult to move between them after completing this section.
Calling an endpoint
To start using the API Explorer, just click an endpoint you'd like to test from the left-hand pane. Let's walk through an example making a simple call with no parameters. Scroll down and select "get_current_account" under the "users" section in the left-hand pane:

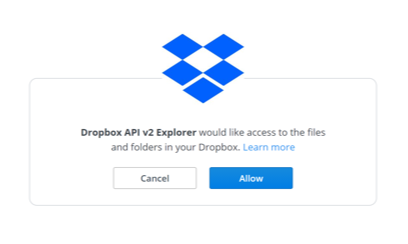
At this point we haven't provided the API Explorer an access token for our Dropbox account. To authorize the API Explorer, click the 'Get Token' button. You'll be prompted to authorize the API Explorer against your Dropbox:

Now that we have an access token, we can start making calls. Since get_current_account requires no parameters, all we need to do is click on 'Submit Call' to see the result:
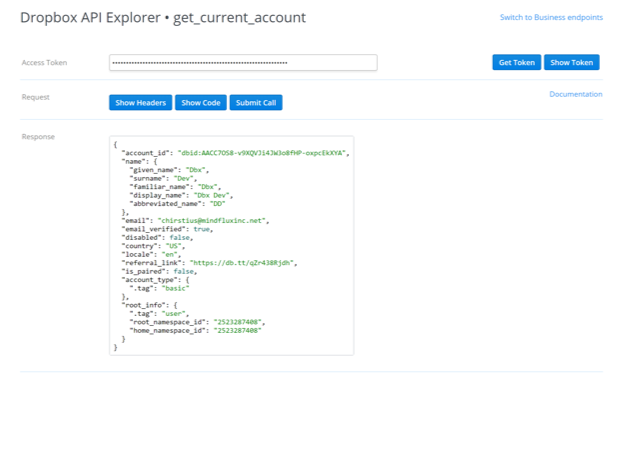
You can see that we get details about the current account we are signed into Dropbox as.
Using parameters
Let's try another example. We know that in order to build our expense organizer application, we'll have to get a list of files within our app folder. The endpoint we need to use for this is "list_folder" under the "files" section in the left-hand pane. Go ahead and select that endpoint now:
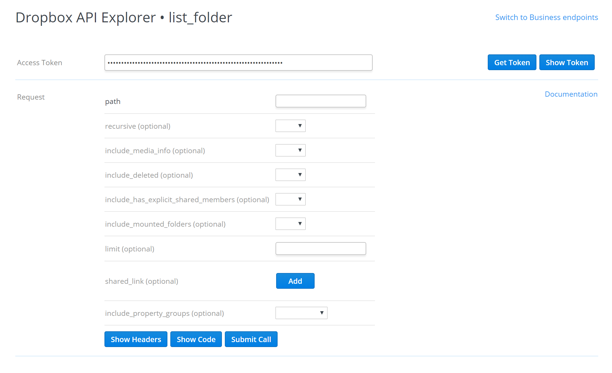
We can see that this endpoint accepts several parameters. If you need help understanding what each parameter does, you can review the documentation. For now, let's just fill in a few values and try to get some results. It's important to note that when using app folder access, as we are here, your initial app folder will be empty, so you'll need to seed some sample data before making these calls to ensure we get meaningful results. In the example below, we've created a sub-folder off the root called "expenses" which contains a few invoices and receipts. We'll set up the API Explorer to list the contents of that folder. At a minimum, I need to provide the "path" parameter and set it to that folder. I'll set a few other values just to see how they alter the results, but note that everything other than "path" is optional:
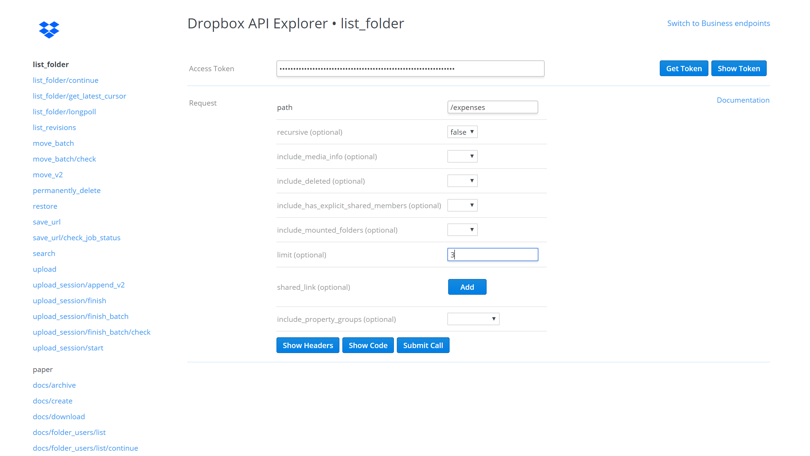
Here we've set the path and made the listing not recursive, since we only want to list the current folder - and not any child folders. We've also set the limit to 3 results for the call. Adjust the "path" and other parameters based on your own Dropbox account (though you can technically leave "path" blank to list files from the root folder) and then click the Submit Call button:
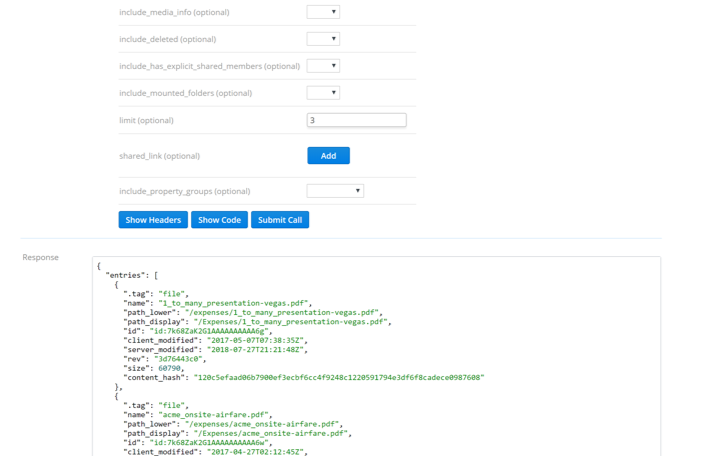
There are a few interesting things to note about the response. First is that we can see there are both files and folders listed in the results and that there are different properties for each. We can also see at the bottom of the request the "cursor" and "has_more" fields. Per the documentation, "has_more" indicates there are more entries available and the "cursor" can be used to retrieve them. Before we do anything else, let's go ahead and copy the cursor so that we can use it to grab the next set of entries. Once you've copied the cursor, switch to the "list_folder_continue" endpoint by clicking it in the left-hand pane:

We can see that this endpoint takes only a single parameter, and it's a cursor. Go ahead and paste in the cursor we just copied, and click 'Submit Call':
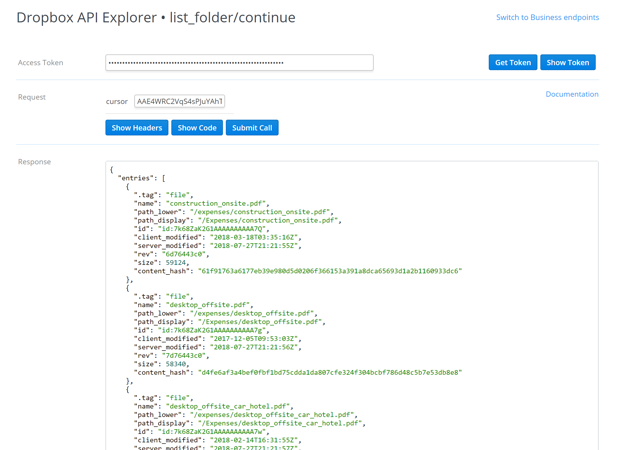
We get a new list of entries, or in this case, the single remaining entry, and we can see that "has_more" is now false. Note though, that we still get a "cursor" back in the results. We can save and use this cursor to make subsequent calls to "list_folder_continue" and get a listing of changes that have happened on this path since our last call. Each time we do, we'll get a new "cursor" that we can save and use for the next call. We don't need to worry about that here but this concept of listing files and using cursors will be an important part of our expense organizer script so it's useful to understand the basic mechanics of these two endpoints.
Summary
We've learned how to access and interpret the API reference documentation, and how to call API endpoints from the API Explorer. Next up, we're going to start writing our first script, an expense organizer that will scan documents in one folder, build a sorted hierarchy of folders organized by year and month, and move files into their proper locations based on their modification times. We've already tested some of the endpoints we'll need to accomplish this - list_folder, and list_folder_continue - but before we move on, we'd like to leave you with an exercise.
Can you find and test another endpoint that would be used to write the expense organizer script? See if you can figure it out and test out some parameters for your Dropbox account.
Building a simple expense organizer app
In the previous sections, we explored creating an app and navigating the App Console, we then took a look at the API documentation and learned how to quickly test endpoints. Now we're ready to put all of that knowledge into action and build our expense organizer app.
App Design
First, let's define what we want our app to do. Given a folder with several unorganized expense files (invoices, receipts, itineraries, etc.), we're going to write a simple tool to sort them into sub-folders based on their modification time.
The sub-folders will be organized by year, and then by month. To do this we'll need to:
- List all of the files in the source folder
- Determine the modification time of the files
- Build a folder structure for each year and month of the modification times found on the files
- Move the files to their proper sub-folders
We now need to find API endpoints that match up to these actions. At the end of the last section we tested the list_folder and list_folder_continue endpoints in the API Explorer. As a reminder, the response from those endpoints looks like this:
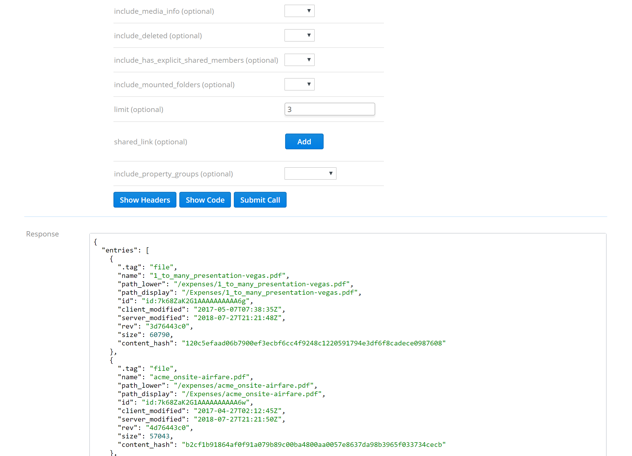
If we examine this we can see that, for FileMetadata, the modification times are already included in the results. This means we can solve steps 1 and 2 from above with this single endpoint call.
Next up is step 3, building a folder structure. Looking through the API documentation create_folder_v2 looks like just the thing to create those folders.
Last up, step 4, is moving the files, and again a quick scan of the documentation surfaces the move_v2 endpoint which is exactly what we need.
By reading the documentation and testing endpoints in the API Explorer, we now know which endpoints we need to use to write our script:
- list_folder
- list_folder_continue
- create_folder_v2
- move_v2
We know what we need to do, and we know how to do it. Now it's time to start writing some code.
Building the app
For this guide we'll be writing the organizer script in Python and we're going to leverage the Dropbox Python SDK to make accessing endpoints even easier.
Before we start writing code, be sure to install python & the Dropbox SDK as described in the overview.
Once we've installed the SDK, we can now import the SDK into our program with:
import dropbox
The next step is to create a Dropbox client instance with an API access token. If you haven't already generated an access token for your app please refer to the "Creating a Dropbox App and Navigating the App Console" section of this guide for information on how you can generate a token from the App Console. Once you have a token, create your Dropbox API instance:
    import dropbox

    print("Initializing Dropbox API...")
    dbx = dropbox.Dropbox("<ACCESS TOKEN>")
Next, referring to our app design, we need to get a list of all the files to be processed. Since we're using the App folder permission model, we can only see files placed into our app root folder (/Apps/\<App Name>/) and below. So let's consider our app root folder as the staging area for files to be sorted, and we'll make all of our year and month-based sub-solders directly beneath that. If you recall from earlier in the guide, when using App folder permissions while your app folder resides at /Apps/\<App Name> that path is presented to your App as root or "/" so in order to list files in our app root folder we will pass an empty path string parameter to the list_folder endpoint, if we were to pass "/Apps/\<App Name>" we would receive a path not found error since effectively we'd be asking for a listing of files and folders at "/Apps/\<App Name>/Apps/\
Let's add a call to list_folder:
    print("Scanning for expense files...")
    result = dbx.files_list_folder(path="")
Here we create a list to hold all of the file and folder entries and then make a call to the files_list_folder() method of the SDK. Let's look at that call for a moment:
result = dbx.files_list_folder(path="")
In this call, we set the path parameter to an empty string which represents the root of our app folder. This is exactly what we want. As an exercise for the reader, it may be worth taking a moment to look over some of the other parameters that could be set here such as 'limit' or 'recursive' and considering how changing their defaults would affect the results of this call. However, for the moment, let's leave all other parameters at their default.
The files_list_folder() method returns a ListFolderResult object (described in the 'Returns' section of the documentation) which is stored in a placeholder variable. Processing this result is a little more complex than it seems. Looking at the description of the files_list_folder() method we will see some guidance around properly processing the various types of entries that we might get back. It's highly recommended to read the documentation in full, but we'll summarize some of the important points here.
When listing the contents of a folder, we have to remember that the file system is "live" - content can be changed in the period between our initial call to files_list_folder() and any subsequent calls to files_list_folder_continue() (if we are required to make them). Because of this, we need to examine the entries returned to us and update the current state of our "view" of the file system, until we receive a response with has_more set to False. To represent our view of the file system we'll use a Python dictionary called files and in that we'll store entities returned from the files_list_folder() and files_list_folder_continue() endpoints. But only after we do a little more processing. Let's look at making a function to handle this processing:
    def process_folder_entries(current_state, entries):
        for entry in entries:
            if isinstance(entry, dropbox.files.FileMetadata):
                current_state[entry.path_lower] = entry
            elif isinstance(entry, dropbox.files.DeletedMetadata):
                current_state.pop(entry.path_lower, None) # ignore KeyError if missing
        return current_state
This function will take two arguments - the current state of our filesystem view, and a list of new entries to process into it. When we call this function we'll pass our files dictionary into it for the current state, and the list of entries from the result of each API endpoint call as the new entries to be processed.
The for loop begins the work of examining each entry, determining its instance type, and then updating the current_state variable based on the instance type and the actions described for it in the files_list_folder() documentation. Let's dive into what happens inside the for loop a bit more before moving on.
From the documentation we know that files_list_folder() will return a ListFolderResult object. Within that object, the entries attribute contains a list of items representing one of these metadata instances:
FileMetadata- Represents a file in the filesystemFolderMetadata- Represents a folder in the filesystemDeletedMetadata- Indicates that there used to be a file or folder at this path, but it no longer exists
In general, each of these metadata instances should be checked for, and the current state should be updated accordingly. But in this case, since we know we that we don't need to process folders for our app, we can ignore FolderMetadata checks for the moment. Instead we'll focus on FileMetadata and DeletedMetadata to update our current state. The if/elif statement checks for the instance type of the current entry and then updates state accordingly, for FileMetadata this means adding them to the dictionary, for DeletedMetadata we'll remove them from the dictionary. Note that while we mentioned earlier that DeletedMetadata might contain metadata for files or folders, we're not checking for that here. This won't cause issues in this specific case since if we encounter a FolderMetadata instance and try to remove it, we can silently ignore the error that will be thrown. However, generally, you will want to check for, and handle, each metadata type appropriately.
So with the new function in place, let's redo our call to files_list_folder and properly process the results:
    print("Scanning for expense files...")
    result = dbx.files_list_folder(path="")
    files = process_folder_entries({}, result.entries)
Here, we pass the list of new metadata entries (contained in result.entries) to our process_folder_entries() function. We return an updated dictionary from that function that we store in files to represent our current state.
Now we can just loop through the files in files and start moving files, right? Well, not just yet. Remember that the ListFolderResult returned from files_list_folder() and files_list_folder_continue() contains a very important property has_more which indicates if there are additional files or folders that were not returned in the results of our most recent function call. If has_more is True it indicates we need to make additional calls to list_folder_continue() in order to retrieve all of the content we're looking for. In order to make the call to list_folder_continue(), we also need another property of ListFolderResult which is cursor. The cursor represents a placeholder for our current position in the list of content and tells list_folder_continue() where to pick up from on subsequent calls. Since we don't know how many times we might need to call list_folder_continue() to retrieve the full listing of content, it's probably best to call it from a loop and use the state of has_more as our loop termination condition. This might look something like this:
    print("Scanning for expense files...")
    result = dbx.files_list_folder(path="")
    files = process_folder_entries({}, result.entries)

    # check for and collect any additional entries
    while result.has_more:
        print("Collecting additional files...")
        result = dbx.files_list_folder_continue(result.cursor)
        files = process_folder_entries(files, result.entries)
Here, we add a while loop that will test for the status of has_more and as long as it's True, we will keep calling list_folder_continue() with the updated cursor from the result and process the new entries to update the state of files.
At this point we should have a complete listing of all the content in the root of our app folder stored in files, now we can loop through the entries and start doing work.
We know that the FileMetadata instance will contain the modified time so we can use that to construct the destination path for our expense files that we'll pass to files_create_folder(). One thing to note is that files_create_folder(), if called with an existing path, will throw an exception. So to avoid creating paths more than once and triggering this, we can add in a simple check to see if a given path exists:
    from dropbox.exceptions import ApiError

    ...

    def path_exists(path):
        try:
            dbx.files_get_metadata(path)
            return True
        except ApiError as e:
            if e.error.get_path().is_not_found():
                return False
            raise
This simple function takes a path parameter and tries to retrieve metadata for that path. In the event that we get a valid result back, we simply return True as this implies the path does exist. Should we get any exceptions, we check for a not_found error and return False indicating the path does not exist. All other exceptions we re-raise so they can be properly handled in the calling code as appropriate.
Using this new function we can create our destination path and add our call to files_create_folder():
    import posixpath

    ...

    for entry in files.values():
        # use modified time of file to build destination path
        destination_path = posixpath.join(
            "/" + str(entry.client_modified.year) + "_Expenses",
            str(entry.client_modified.month)
        )

        # check to see if we need to create the destination folder
        if not path_exists(destination_path):
            print("Creating folder: {}".format(destination_path))
            dbx.files_create_folder(destination_path)
Here, we build the destination path which will look like:
/<YEAR>_Expenses/<MONTH>
We use the client modified time to build our path here, but there is also a server modified time that can be used. Just be aware that the client modified time can be set by any app via the upload endpoints and hence it might be less reliable than the server modified values.
Ok, if needed, we have created the required path to sort our file into. Let's now perform the move. We can do this by adding a call to files_move_v2() using the existing file path stored in entry.path_lower and the newly constructed destination_path:
    for entry in files.values():
    ...
        print("Moving {} to {}".format(entry.path_display, destination_path))
        dbx.files_move_v2(entry.path_lower, destination_path)
And with a few final touches, our first app should be complete:
    import dropbox
    import posixpath
    from dropbox.exceptions import ApiError

    def process_folder_entries(current_state, entries):
        for entry in entries:
            if isinstance(entry, dropbox.files.FileMetadata):
                current_state[entry.path_lower] = entry
            elif isinstance(entry, dropbox.files.DeletedMetadata):
                current_state.pop(entry.path_lower, None) # ignore KeyError if missing
        return current_state

    def path_exists(path):
        try:
            dbx.files_get_metadata(path)
            return True
        except ApiError as e:
            if e.error.get_path().is_not_found():
                return False
            raise

    print("Initializing Dropbox API...")
    dbx = dropbox.Dropbox("<ACCESS TOKEN>")

    print("Scanning for expense files...")
    result = dbx.files_list_folder(path="")
    files = process_folder_entries({}, result.entries)

    # check for and collect any additional entries
    while result.has_more:
        print("Collecting additional files...")
        result = dbx.files_list_folder_continue(result.cursor)
        files = process_folder_entries(files, result.entries)

    for entry in files.values():
        # use modified time of file to build destination path
        destination_path = posixpath.join(
            "/" + str(entry.client_modified.year) + "_Expenses",
            str(entry.client_modified.month)
        )

        # check to see if we need to create the destination folder
        if not path_exists(destination_path):
            print("Creating folder: {}".format(destination_path))
            dbx.files_create_folder(destination_path)

        print("Moving {} to {}".format(entry.path_display, destination_path))
        dbx.files_move_v2(entry.path_lower, destination_path + "/" + entry.name)
    print("Complete!")
Let's test it out.
We've seeded our app folder with some sample files that have a range of modification times:
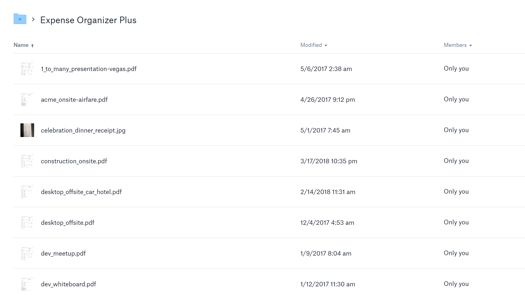
We can see there's a mix of 2017 and 2018 dates so we should get at least two folders created for years and then some number of subfolders under each of them for each month represented in the sample files. Let's run the app and see the results:
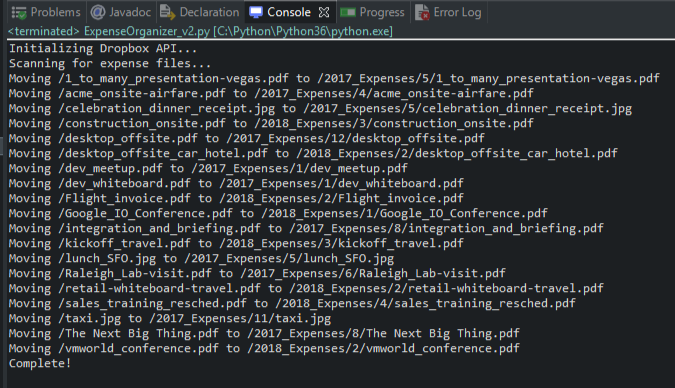
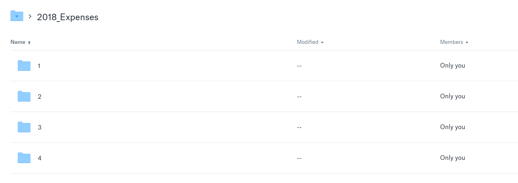
And now our app folder contains:

Diving into one of those folders shows us this:
And one more step down, into a given month, shows our files nicely sorted:
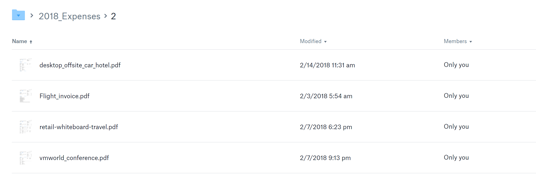
All we need to do going forward is drop new expense files into our app folder over time and then run our app to sort them.
Summary
That's it! We did it! Our first app on the DBX Platform is up and running, but development certainly doesn't stop here. While we now have a good introduction to developing on the DBX Platform, and we've built a useful tool, there are still several features we're missing. Right now, only we can use our app. If we want others to be able to use it we'll need to add an OAuth 2 authorization flow. Also, currently, our app must be run manually each time we want to organize our files and while we could add it to cron or task scheduler to run at set intervals, there is a better way to manage this: webhooks. In future articles we'll cover how to extend and enhance our app to support these features, but in the meantime here are a few next steps you can explore to continue building with the DBX Platform:
- Add the capability to append a timestamp to the file name when the file is moved.
- Limit the app to only organize certain file types/extensions (PDF, JPG, DOCX, etc.)
- Include MediaMetadata (hint: you'll need to change your call to files_list_folder()) and sort images based on location data vs timestamps
- Add the capability to persist the final cursor returned from files_list_folder_continue(), add/remove/update content in your app folder and see what subsequent calls to files_list_folder_continue() returns. How can this be used to improve the app?
- Build a companion app to upload/download expense files to your app folder via the API, or add this functionality to an existing app by integrating the Dropbox Chooser or Saver into it
- Incorporate an OAuth authorization flow
- Deploy your app to a cloud infrastructure service such as AWS, Heroku, or Google App Engine
- Review the Branding Guide and make sure your app is ready for the production approval process
When you're ready to explore other DBX Platform examples you can start with the Node Photo Gallery.